I looked long and hard for a stuffed owl for baby Gavin, and I just couldn't find one that I was happy with. One that matched his room and was soft for babies. Once again, my sewing machine saved the day! (I should note that I made this owl the night before Gavin was born, not since he was born. I suppose it was one last nesting push.....nesting.....get it?!) I thought since I had made the quilt already, I might as well use some of the leftover fabric from that (and some additional fabric) to make a patchwork style owl that matched. I didn't use a pattern or anything, I just knew what I wanted and drew out a basic pattern for myself. Here's what I did:
I drew the size owl that I wanted, then I added 1 1/2 inches to that to account for a seam allowance and some thickness when I added the stuffing. I did half of the owl and folded over the fabric, to make sure he was symmetrical.
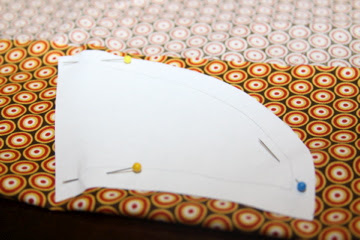
I folded over the fabric and pinned on my pattern, then cut.
Here he is all cut out
Then I did the same for the front side. (I had already started cutting when I snapped this pic)

Then I made the wings (again, adding a 1/2 inch seam allowance) I cut two front wings and 2 back wings, out of the fluffy white fabric I used for the back of the owl.

For the eyes, at first I used at Starbucks cup as a pattern, but I thought it was too small.
So I switched to a canning jar lid and liked that size better.
For the inside of the eyes, I found this coordinating fabric and picked one of the circles and just cut it out.
For his tummy, I made another little pattern.
Then I laid everything out to make sure I liked the way it looked before taking it to the sewing machine.
Then I took all of the pieces that were part of the face, and would have an edge showing, and used this fray check (with a special applicator tip) and applied it to all of the edges. It only took a few minutes and beat the heck out of giving all of those round pieces hems.
Now for the sewing. The first thing I did was sew the wings together. I just did front side to front side and sewed the edges together. I didn't sew the seam that attached to the owl, no need. I didn't stuff these, I wanted them to be floppy.
Then I started on the face. His little nose is tucked under the eyes, so I started with that first, making sure to get it as centered as possible. This was the only time I changed the thread from brown for this project. I wanted the orange to stand out for the beak so I used orange thread. I also used a zig-zag stitch, set on a medium width and sewed the edges down.
Then I did the first layer of the eyes, followed by the top layer of eyes.....
And finally the belly.
It was at this point I decided to pass on the button eyes (that were in the picture where I laid everything out above). They were really cute, but I didn't want to have to worry about baby pulling them off and choking on them. They were perfect size for little hands to grab, and I thought that the pattern lent itself to looking like a pupil anyway. If it weren't for a baby, I'd probably consider adding them.
This is probably the most complicated step (and it's really not that complicated). Attaching the front to the back, and the wings. I put the wings on the outside layer (the "good" side) of the back side and lined them up where I wanted them and then put the face on (with the outside in.....good sides together). Pin it like crazy. Then I sewed a 1/2 inch seam around everything, leaving a small area at the bottom for me to fit my hand in and stuff him.
Then turned him right side out.
And stuffed him until I was happy with how fluffy he was...
Then used a needle and thread to and sew the bottom shut, making sure to fold the edges in, so I don't have any edges showing.
Easy peasy! Serious, the whole thing took less than an hour. I am so inspired by how easy this project was I might even make a whole bird family!


Super cute, Michelle!!! Owls were our first choice for WIlliam as well, but I had a hard time finding owl fabric around here that didn't have loads of pink. =/
ReplyDeleteI had the same problem Melissa! It's all so girly. That how I ended up making those custom owl squares for the quilt and just picking other fabric that wasn't owl that matched. I love beings able to sew though! It makes getting what you want so much easier!
ReplyDeleteSo cute! You could totally sell those on etsy.
ReplyDeletelove the owl. this would be perfect for Spencer's room - he has a forest theme
ReplyDeleteThank you so much for sharing this! This is adorable and I used your tutorial and posted my finished product (with a link back to you) here: http://www.aloadofcraft.com/2011/10/stuffed-owl.html
ReplyDeleteThanks @Star! I saw your owl and he turned out really cute.
ReplyDeleteSuper cute owl! I found your tutorial on Pinterest. Can you tell me what kind of stitches you used for everything? I'm trying to make an owl stuffie but the fabric keeps ripping. I'm using flannel for the belly and really soft blanket type material (like your brown fabric) for the body.
ReplyDelete